Workflow: Disconnect from and Reconnect to a Data Sync Case
Applies To:TRIAL DIRECTOR, Presentation
In this article
Review the Prerequisites
1. Create a Data Sync-Enabled Case
2. Add Documents, Images, Transcripts, Clips, and Multimedia to a Case
3. Trial Consultant - Brings Case Data Local
3. Other Team Members - Continue to Make Case Changes
4. Trial Consultant - Reconnects to the Network
This topic contains high-level procedures to help you create a case, add case items, and bring case data local in preparation for disconnecting from the network to go to court. It also explains how to reconnect to the network and describes how your offline changes are integrated into the case when you reconnect to the network.
The following illustration shows the basic process outline. The numbers correspond to the procedures later in this topic. You can click on the numbered steps in the image to jump to a specific task in the workflow.
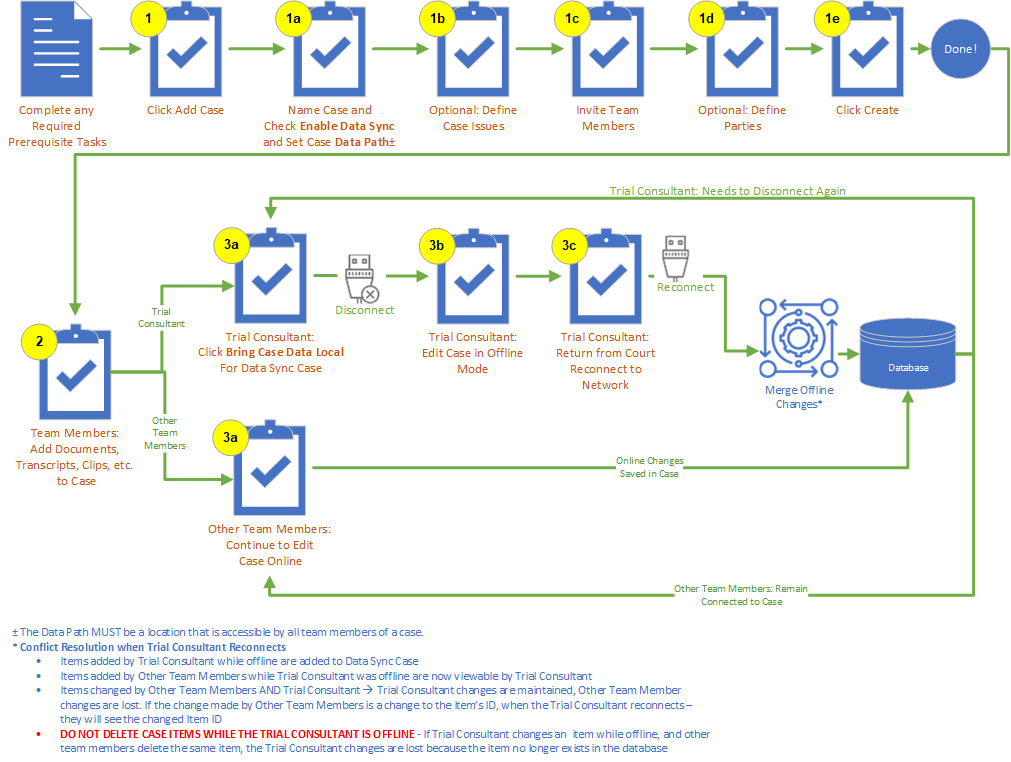
The basic workflow diagram, above, and the tasks that follow outline the process for disconnecting and reconnecting to the network for a Data Sync-enabled case.
|

|
Tip: To make it easier to find the procedures you need, the procedures are collapsed. If you want to expand a procedure, click the triangle next to the procedure title to open and close the detailed information.
|

Before you begin using Data Sync, you may want to view the Data Sync video, below.
The following table shows the prerequisites that must be in place before you start.
|
Set Up Data Path Location in Shared Location
|
In order for team members to be able to work collaboratively on a case, every team member must have access to the Data Path location defined when you create the case. Make sure you have this location set up before you create the case.
|
|
Set Up Network Data Store Location in Shared Location
|
In order to use Data Sync, which allows you to work collaboratively on TRIAL DIRECTOR cases, you must have a Network Data Store location that all team members have access to. The Network Data Store is used to synchronize changes to cases in a multi-user environment. During installation, you will need to enter a network UNC path that is accessible by all case users (see next prerequisite).
|
|
Install TRIAL DIRECTOR and Enable Data Sync
|
In order to be able to work collaboratively on Data Syn-enabled cases, when team members install TRIAL DIRECTOR, they will need to provide the UNC path to the Network Data Store Location that was set up in the previous prerequisite step. For complete installation instructions, see Workflow: Install LOCAL DISCOVERY or Workflow: Install TRIAL DIRECTOR.
|
The first step in the process of using TRIAL DIRECTOR is the creation of a case. After a case is created, you can import case items, as well as view and change those case items. To share the case with other team members, and work collaboratively on the case, you must enable Data Sync when you create the case. You cannot change a case to be a Data-Sync enabled case after the case has been created.

|
Important: Make sure you have completed the prerequisites before creating a Data Sync-enabled case.
|
To create a case, open Case Manager and follow the steps below:
-
Click the Create Case button.
-
The Create Case wizard appears. On the first page of the wizard:
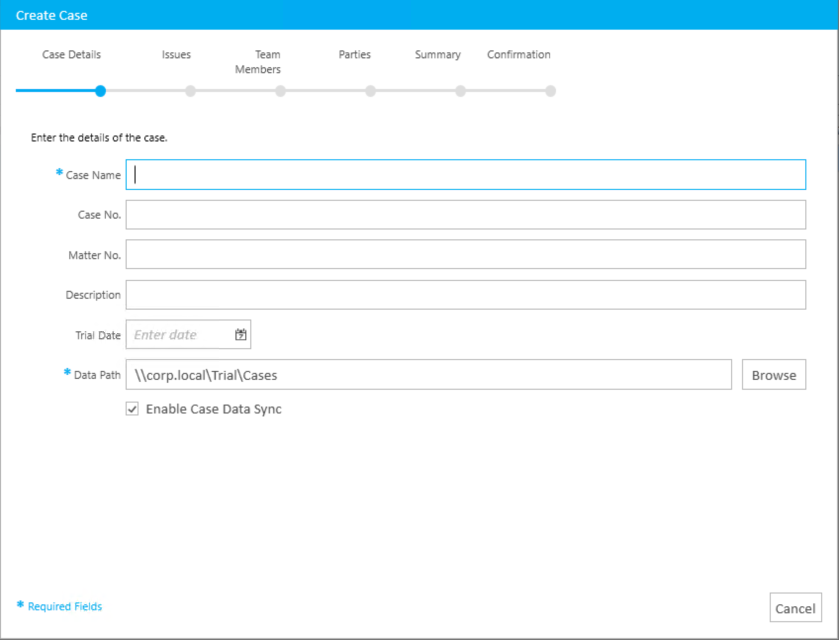
- Enter a Case Name
- Enter a Case Number
- Enter a Matter Number
- Enter a Description
- Enter a Date
- Enter the Case Data Path location. This is the location where the case is stored. It must be accessible to all team members assigned to the case.
- Check the Enable Data Sync check box. THIS IS CRUCIAL. You must check this box before proceeding. If you do not enable data sync at the time of case creation, it cannot be changed to be a Data Sync-enabled case later.
- Click Next.
- Fill in the information on each page of the wizard and click the Next button to progress to the next step.
|
|
Note: Only the case information on the first step, Case Details, is required to create the case. The other steps, Issues, Team Members, and Parties, are only included for your convenience. You will be able to add or import issues, Invite a Team Member, and Add a Party after the case is created. You must enable Data Sync if you plan to work collaboratively with other team members that were invited to the case.
|
-
When you arrive at the Summary step, click the Create button.
After you click the Create button, the case is created and you can choose from the following options on the Confirmation step:
-
Create New - Create another new case
-
Open Case - Open the case you just created in Case Manager
-
Open in Evidence - Open the case you just created in EVIDENCE
Before trial, you and the other team members who have been invited to the case will all work in the case, adding and changing case items (documents, images, transcripts, clips, multimedia, etc.). See the following topics for more information on some procedures you can undertake while working in a case.
When a Trial Consultant goes to court, or any user decides to go offline and continue to work on the case, they must first click the Bring Case Data Local button to download the case files locally onto their machine.
To open a case, open Case Manager, and bring the case data local, follow the steps below:
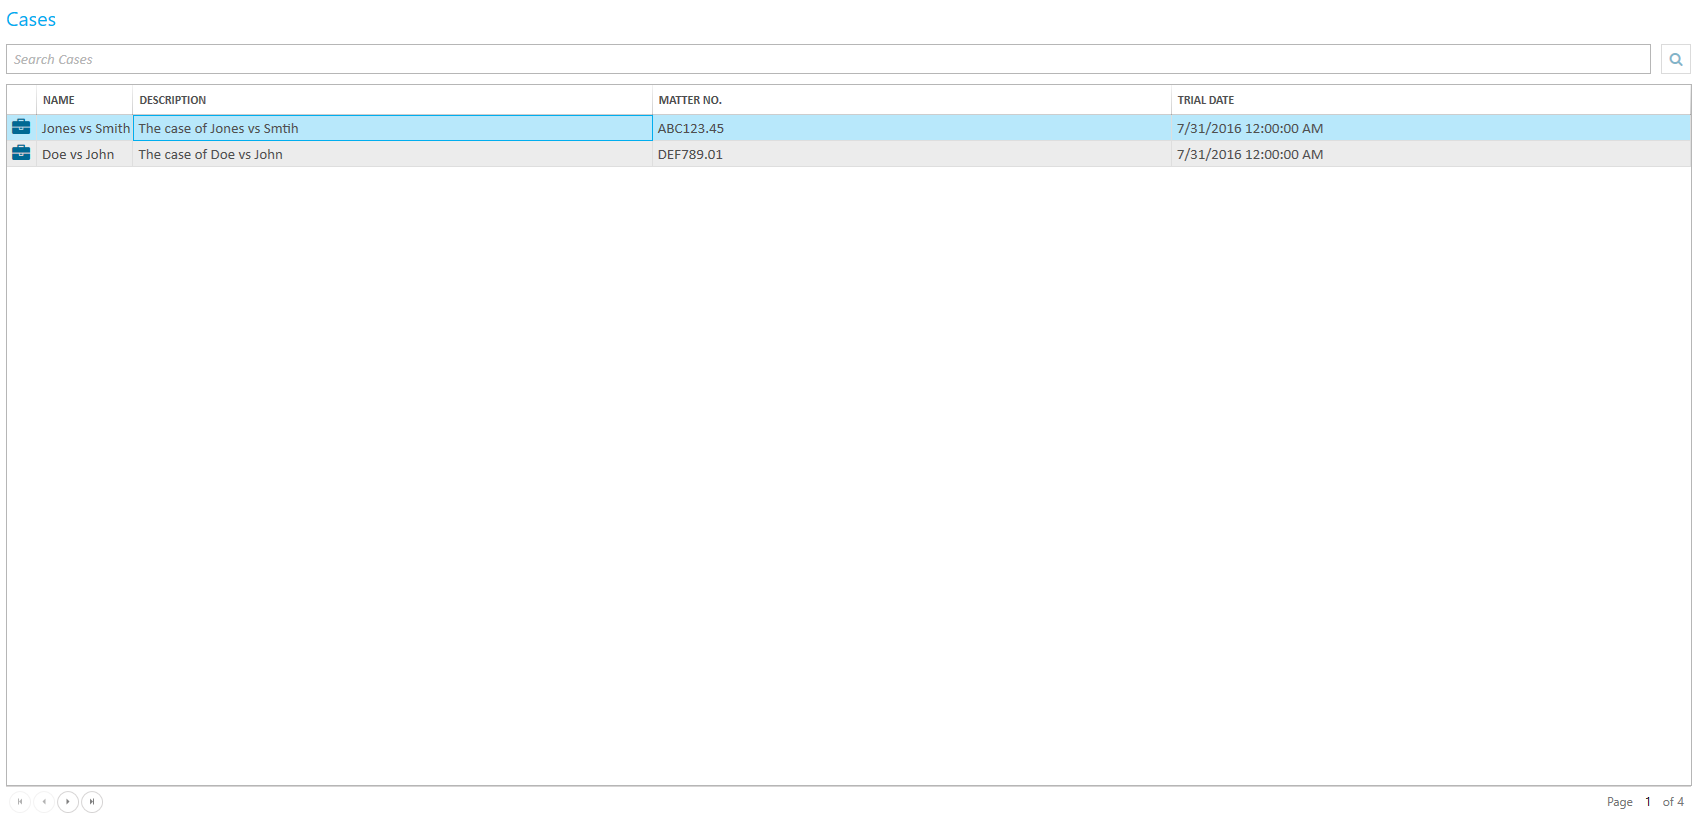
-
Select a case from the Cases table on the Case Manager Start Page.
-
With the case selected, click the Open Case button.

The case is opened.
-
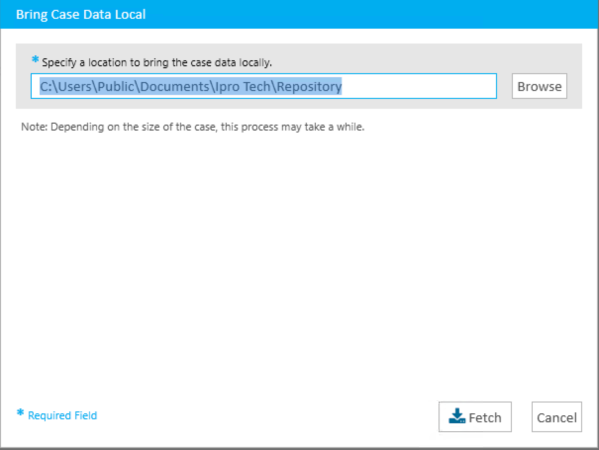
In the Case Details panel, click the Bring Case Data Local button.
The Bring Case Data Local window opens.
-
Enter a case location where you want the files downloaded.
|

|
Important: The location you enter must be a location that is accessible to you when you are NOT connected to the network. For example, this could be either your local laptop drive or the location of an external hard drive that you bring with you to court.
|
-
Click the Fetch button.

|
|
Important: DO NOT disconnect from the network before the case download is finished. If you do so, the case items will not be available to you while you are offline.
|
When the download is complete, the completion window displays.
- Click Close.
- While the Trial Consultant is offline they continue to make changes to the case. These changes are stored locally in the location referenced when they clicked Bring Case Data Local before disconnecting from the network.
While the Trial Consultant is disconnected from the network, the other team members continue to make changes to the case. They do so following the steps outlined in step 2 of this article: 2. Add Documents, Images, Transcripts, Clips, and Multimedia to a Case.
When the Trial Consultant reconnects to the network, the changes they've made to the case are synchronized into the case. There are no steps that need to be taken in TRIAL DIRECTOR to make the synchronization take place. This happens automatically, in the background.
Here is a summary of how the synchronization works:
- Items added by the Trial Consultant while offline are added to the Data Sync Case
- Items added by Other Team Members while the Trial Consultant was offline are now viewable by the Trial Consultant
- For those items changed by Other Team Members AND Trial Consultant, the Trial Consultant's changes are maintained, while the Other Team Members' changes are lost. If the change made by Other Team Members is a change to the item’s ID, when the Trial Consultant reconnects – they will see the changed Item ID
- DO NOT DELETE CASE ITEMS WHILE THE TRIAL CONSULTANT IS OFFLINE - If the Trial Consultant changes an item while offline, and Other Team Members delete the same item, the Trial Consultant's changes are lost when the Trial Consultant reconnects to the network because the item no longer exists in the database
If the Trial Consultant needs to disconnect again, they must click the  button. When they do so, assuming they are bringing local to the same location, only the case changes that have taken place since their last download will need to be downloaded to the files on their local computer. In other words:
- The first time they click the button, all of the files for the case must be downloaded to the local machine.
- Any subsequent time they click , Data Sync will download only the changes since the last time the button was pressed for the selected case on this same machine.
Related Topics
Overview: Data Sync
FAQs: TRIAL DIRECTOR Data Sync
 Review the Prerequisites